Growing Your Food – It’s More Than Just Seeds
I am not the first to say that planting a garden is one of the first prep skills that one should learn. As mentioned in a previous post, there are many benefits of growing your own food. And obviously, just having lots of varieties of seeds on hand is not enough, it’s also necessary to have experience actually growing your food, literally getting your hands dirty, if you want to have an abundant crop.
With every kind of plant having it’s own particular requirements, such as how best to germinate the seed, when to plant, sun and water needs, days till harvest, pest control, etc. There really is much to learn before you can ditch the grocery store for good.
But even if you’re already an expert gardener and have all that knowledge and skill, you’ll have trouble with your garden if you don’t have some essential equipment and various preparations made.
Getting To Your Soil
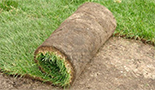
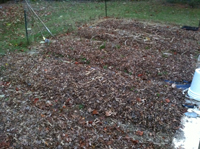
When I moved into my house, there was no garden in the backyard, it was only grass. Well, let me tell you, removing sod is not a task lightly done. To bad you can’t roll sod off like you can roll it on. Luckily I had a large tiller to help me out. If you don’t expose your dirt while you have access to machines though, you’ll soon find out that it is very hard and/or slow work.
Short of finding an Amish farmer with a horse and plow, here are four ways to get rid of grass :
Tilling – As was mentioned, machine tilling will be the less labor intensive and the quickest, although it is by no means easy. You can rent one of these machines, do your work, and bring it back the next day.
Chemicals – Another option you can use while you have access to them. Spraying your lawn with herbicides will kill the grass. Not sure I would want to plant a garden right away in that soil though. You’ll still need to get rid of the grass and roots.
Digging – Get your shovels and muscles ready, you’re in for some work. If you wait till the SHTF, you will have little choice than to use this method.
Smothering – The least labor intensive of the choices, but it’ll take at least a few weeks before your garden bed is ready. All you do is cover your grass with layers of cardboard and/or newspaper, enough to block out all light. Eventually the grass will die.
Once you have your grass removed you still have a ways to go however.
Preparing Your Soil
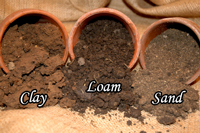
After the grass is removed you might have another inch or so of top soil. You’ll need to find out what is under that and determine your soil structure. If you haven’t already, take a shovel and get to the dirt a few inches deeper. There are many gardening resources that will help you determine what kind of soil you have and how you can upgrade the soil to peak gardening level. But here are a few (bad) basic soil types:
Clay – Gardens with this kind of soil are tough to work with because the air has a hard time getting to the roots. The soil absorbs and holds water and creates a drainage problem. This negatively affects healthy root and plant growth.
Sandy – The water and nutrients (like nitrogen) quickly drain away from the plant roots. Sandy soil is the opposite of clay soil.
Silty – Like clay, the soil holds water but doesn’t have good aeration around the roots.
What you want is loamy soil, and unfortunately ground that was never farmed or gardened before is usually not this. The good news is that the way to turn any of the above bad soil types into a good loamy type is to add lots of organic matter. This can be peat moss that you by from the store, but it can also be the free stuff you find everywhere in the fall, namely dead leaves.
Now you have to ‘turn’ all this organic matter into your soil. This means you have to mix the peat moss or leaves with your dirt. You’ve got to get this as deep as possible so it really helps again to have a tiller around. It takes a few years of this process to change bad soil into good gardening soil. Unfortunately, even when your soil is amended (a fancy gardening word meaning fixed), you’ll need to turn your soil every year when spring comes along to let the little roots of your young plants to grow deep and healthy.
When machines are not available, it will be necessary to turn and break up the chunks of ground manually. For this you’ll a tool called, you guessed it, a manual tiller. It’s hard work to till by hand, but it needs to be done somehow.
Preparing Your Seeds
Your dirt is all soft and loamy so now you’re ready to plop your seeds in the ground are you? Well not so fast. Not all seeds like to planted directly in the cold springtime dirt. Depending on the length of our growing season, you might need to germinate some seeds indoors, otherwise a late frost is liable to kill off those baby plants.
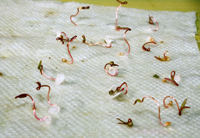
The best method I’ve found to germinate my seeds, is to pre-germinate them by sticking them onto a moist paper towel and putting that neatly into a plastic zip-lock bag and sealing it up. Within a few days (depending on the type of plant), you will see fine new roots growing out. This method works great for smaller seeds like tomato and pepper.
Don’t wait too long to take them out though because the roots may grow through the paper and then it will be difficult to remove the new plant without breaking the root. Once most of the seeds have germinated, I carefully lift off the plants that look the strongest (using tweezers) and put them into small pots filled with lightly compressed dirt maybe mixed with a bit of sand. (Potting soil is better for baby plants, but chances are we won’t have access to that option).
Watering Your Plants
Eventually you will be transferring your plants into the garden. Even in the areas of the world that receive plenty of rain, it doesn’t always come evenly distributed over time. You might have three days of rain in a row and then six straight days of sun. Your plants will get thirsty. Of course you have water storage for your family to drink, but don’t forget about your plants!
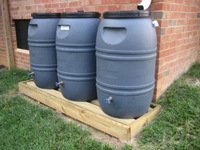
At least the water for your plants most likely doesn’t have to be filtered or purified. The bacteria in the ground will do that work for you. Unless you are near a lake or stream though, you’ll need to get some rain water stored up. Rain barrels, pretty much a 55 gallon drum with a spigot near the bottom, work great.
Hook it up to your downspout and run a hose to your garden. For a gravity fed system however, the water storage container will need to be raised above the level the garden. Cement blocks that are stackable will work better than wood that will rot over time.
Supporting Your Plants
Why those deadbeat plants, can’t they support themselves! Well, no, not if you want lots of vegetables to hang from their branches they can’t. Tomatoes, beans, and cucumbers for example will all need some kind of supporting structure in order to produce the most yield. Elevating the growth of these plants also helps keep the pests away as well.
A few ideas to consider:
Tomato Cages – Don’t get the smaller versions. They are not tall enough. To properly support the full growth of the plants you need the cages that are at least four feet high.
Home Made Trellis Systems – Any number of variations can be created, but the point here is that you will need these items ahead of time.
– Wire or weather resistant cording
– Wood posts like 2×2’s or larger
– Nails/Screws
– Metal Lattice
– Netting
Protecting Your Plants
I’m not talking guns here, there are better uses for your ammo. The biggest problems that I’ve faced in my six years of gardening were insects, and squirrels. Once a fat ground hog came around and feasted on my lettuce, but in a survival situation I would welcome that sucker to come around again.
You can’t do much about insects besides picking them off if you are not ready for them. It seems that each year brings a new plague as well. One year it was cucumber beetles that basically destroyed my crop. Another year it was an infestation of Japanese beetles on my beans. And always the slugs by the end of the summer slime-ing holes into almost everything . . .
Nevertheless, here are a few ideas to help beat those insect pests:
Chemical Spray – On the off chance that you have some insecticide stored. Detergent or a soapy mixture works too against insects like aphids, but not beetles. You’ll need a hand pump sprayer for this as you won’t have access to a pressurized water hose.
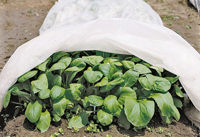
Row Covers – Basically large clear plastic sheets that you can lay over the (usually smaller plants) during the height of an infestation. Plastic sheeting is a good item to have on hand for dealing with other emergencies as well. You can use inexpensive sheeting found in the paint section for example.
Cloches – Cover one plant at a time using a cut open clear soda bottle for example. Those might be scavengable.
Greenhouses – Or mini-greenhouses. You’ll need plastic sheeting and a support structure like wood, metal, or PVC to build it. Similar to floating row covers.
Depending on the area you live, you’ll also be dealing with animals as well. Squirrels of course, birds, rabbits and maybe even deer (though there might be less of those around if the grocery stores are all empty).
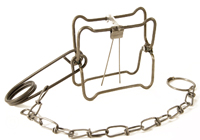
Traps – Might as well use your garden as bait. All manner of traps and snares can be used to catch little critters. I like conibear type body trapsas they are quick and make the kill for you. Size 110 for squirrels and 220 for rabbits.
Netting – Good for later in season to deter birds. You can also use netting for catching fish, and helping with your camouflage.
Basic Garden Maintenance
There are tons of different garden tools that you can acquire, but lets stick with the tried and true:
Wheelbarrow – For hauling dirt and other stuff around the premises. It would suck if the wheel on the wheel barrow popped so maybe getting one with a non-pneumatic wheel (no inner tube to inflate) would be a good idea.
Hoe – For removing weeds.
Mattock – For removing sod, chopping roots, and so much more!
Shovels – Long handle and smaller handheld ones.
Pitchfork – For turning dirt especially if you don’t get a manual tiller fork as mentioned above. Good for digging up potatoes too.
Gloves – Having a few extra pairs of gloves would be a good idea.
Lastly, don’t forget about tool maintenance. Wooden poles and handles can break, metal gets rusty, how about a metal file to sharpen to things up a bit . . .
Is That All?
The list can get very long indeed. But if you’ve already had a garden for a while, I’m sure you have many of these items already. But if you really can’t get any food from the store, you’ll probably be needing to expand that garden from a nice-to-have-hobby size to a holy-crap-how-much-grass-do-I-need-to-get-rid-of size as you turn your entire yard into a garden.
If you don’t have any of these garden preps made, you better get started on obtaining some equipment and exposing that dirt. Not ready to dig up half your yard or deal with with a huge garden yet? Take out as much sod as you can and turn the area into flower beds. Plant a few medicinal flowers like echinacea and cover the rest of the ground with cedar mulch. When you need to, it’ll be an easy job to rake up the cedar mulch to expose the soil underneath.
Well that’s about it. I’ll update the page as new ideas come in. So if I missed anything just let me know.